Posted by Cameron on 03.07.10 2:40 PM
2010 AEC *All Rights Reserved*")
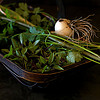
Tara, one of our very favorite meat-eating vegetarians, is on the San Francisco leg of her book tour. Happily for us, we’ve been able to see quite a bit of her when she’s not chatting with admirers, moderating debates between militant vegetarians and ethical carnivores, and seducing the crowds with her prose.
We got to talking about meat pies in general and pork pies in particular, and Tara told us about something that she had read in Danny, The Champion of the World, by Roald Dahl. The passage, which she first encountered when she was very young, describes a cold meat pie with hard-boiled eggs buried in it. The description struck a nerve, and it stayed with her into adulthood (apparently, she’s not the only one).
I love meat pies. Love, love, love, love. Cornish pasties, forfar bridies, empañadas, pot pies, steak pies, pork pies, you name it; there’s just something completely, utterly, and ineffably right about the combination of meat and pastry. Tara hadn’t even finished her story before Anita and I were waggling our eyebrows at each other and grinning like schoolkids. “So,” I asked the woman who has only recently begun to forge a relationship with meat after a lifetime of vegetarianism, “Want to make a pork pie?”
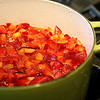
What fun! While Anita weighed and diced up the filling, Tara pulled together the hot-water crust with the quick, sure movements of a woman who has been cooking almost since she could walk. I caught the briefest of hesitations when she turned to the next step, but undaunted, she was quickly up to her forearms in a bowl of three different kinds of cold chopped pork. In honor of Mr. Dahl’s Danny, we buried hard-boiled eggs in the filling, and then I rolled out the top crust and crimped it in place.
This is my third time through this recipe, taken from The River Cottage Meat Book, and it’s a winner. The recipe doesn’t call for hard-boiled eggs, but they did just fine when we popped them in there.
The only downside of pork pie is that — because it’s best cold — you don’t get to taste it until the day after you’ve made it. We put together the pie on Sunday and it was our Dark Days Challenge dinner on Monday night, with pickles and mustard on the side.
Raised Pork Pie
– adapted from The River Cottage Meat Book
Filling
2# pork shoulder, cut into 1/2 inch cubes
8 oz fatty sausage meat (or ground pork belly)
8 oz salt pork, pancetta, or bacon, finely chopped
5 to 6 hard-boiled eggs, top and bottom trimmed so yolk shows through (optional)
12 sage leaves, finely chopped
leaves from 2 good sprigs of thyme, chopped
1 tsp salt
1 tsp coarsely ground black pepper
1 t ground white pepper
1/2 tsp ground mace
A good pinch of cayenne pepper
1 bay leaf
1 cup good pork stock that will set to jelly
Crust
7 T lard, diced
7 T butter, diced
Scant 1 cup water
4 1/4 c AP flour (approximately 630 g)
1-1/2 t salt
2 medium eggs, beaten, plus 1 egg, beaten, to glaze
Make the hot water crust pastry first. Put the lard , butter, and water in a saucepan and heat gently until melted; do not let it boil. Put the flour and salt in a mixing bowl. Make a hollow in the center and add the beaten eggs, stirring them gently around with a knife so they are half mixed with the flour. Pour in the melted fat and water and mix together to form a soft dough; add up to 3 1/2 T extra warm water if it is too dry. Knead gently, adding more flour if it is too sticky to handle. Wrap in plastic wrap and chill thoroughly (at least 1 hour).
For the filling, mix all the meats with the herbs, salt, and seasonings (except the bay leaf), so they are thoroughly combined.
Now assemble the pie. Preheat oven to 350 degrees. Cut off a generous quarter of the pastry and keep in the fridge, for the lid. On a floured surface, roll out the rest of the pastry into a 12 inch circle around 1/3 inch thick. Use this to line an 8 inch springform (or removable bottom) cake pan, pressing the pastry into the sides and flattening any overlap with your fingers. It should come 2-1/2 to 3 inches up the sides of the pan.
Fill with the seasoned pork mixture and push the bay leaf into the middle of it. (If you are adding eggs, lay down a thin layer of filling, place the eggs in a ring halfway between the center and the pie edge, and then add the rest of the filling around and covering the eggs.) Roll out the reserved piece of pastry into a circle about the size of the pan. Brush the edges of the lining pastry with a little beaten egg, and lay the pastry lid on top of the pie. crimp the edges together so they are sealed. Cut a 1/3-inch diameter hole in the center of the pastry lid.
Place the pie in the oven and bake for 30 minutes. reduce the temperature to 325 degrees and bake for a further 1-1/4 hours. If your top crust is concave instead of convex, a pool of juice and fat may form around the center hole during baking that you’ll want to remove with a turkey baster, or the crust may become soggy.
Remove the pie from the oven and carefully release the side of the pan. Brush the top and sides of the pie with beaten egg and cook for another 15 minutes to set the glaze. Take the pie out of the oven and allow to cool. The filling will have shrunk slightly, creating a cavity that is traditionally filled with jellied stock. When the pie is still a little warm, heat the jellied stock just until it’s pourable — not too hot! Carefully lift the edges of the center hold of the pastry with the tip of a knife, making sure you have good access to the cavity. Use a small funnel or, better still, a turkey baster to gently introduce the stock through the center hole. Tilt the pie from time to time to distribute the stock, then try and get a little more in. Stop when the stock begins to overflow from the hole. Leave the pie to cool, then put it in the fridge.
 Farmers and food artisans who created the ingredients for this week’s meal:
Shasta Valley Farm, Gazelle: pork loin and pork sausage
Boccalone, Oakland: pancetta
Prather Ranch, MacDoel: leaf lard
Soul Food Farm, Vacaville: eggs
Guisto’s Vita-Grain, South San Francisco: flour, sea salt
Spring Hill Cheese Company, Petaluma: butter
…and our own homemade pickles, and homegrown celery and carrots (for pork jelly); sage, bay, and thyme
exemptions: pepper, mace, cayenne
Dark Days challenge, locavore, meat, recipes
15 Comments »


Posted by Cameron on 01.31.10 8:57 PM
2010 AEC - All Rights Reserved") The display read 101°F when the digital thermometer beeped, which might have been okay if we were proofing yeast. But we were in the bedroom, not the kitchen — and the thermometer was under the tongue of my very achy, very sick wife. “You are not going to work,” I said. “And I am coming home early and making chicken soup.”
The display read 101°F when the digital thermometer beeped, which might have been okay if we were proofing yeast. But we were in the bedroom, not the kitchen — and the thermometer was under the tongue of my very achy, very sick wife. “You are not going to work,” I said. “And I am coming home early and making chicken soup.”
I don’t have an operatic range as a cook, but chicken soup is one of the dishes that I do well. I wish I could say that I follow a Secret Family Recipe steeped in a Romantic Patina of age and memory, written carefully in cursive on an index card that is Stained with Character and Creased with Use.
But the truth is that I found my chicken soup in a cookbook while we were living in Seattle, and I was first drawn to it by the fact that it had a gimmick: You start with a whole chicken and some vegetables, and end up two hours later with soup. The trick is accomplished by cutting the chicken (except for the breast) — bones and all — into very small pieces and sautéeing them before making a super-quick broth. It’s fast, it’s easy, it’s reliable, and it tastes fantastic.
I can modestly admit to having made a few small discoveries and tweaks to the basic recipe. The original calls for a 4-pound chicken, but I discovered that the larger the bird, the more tasty the soup. These days, we’re getting lovely little 3- to 4-pound birds from the Soul Food Farms CSA, so I add some feet, necks, and wings from the stock bag in the freezer to bring the total weight up to five pounds. I also cut my onions as finely as possible instead of the original medium dice, because I like them to melt into the soup.
Finally, the original recipe calls for noodles, but I much prefer dumplings. I make a slightly wetter version of my standard biscuit dough and — when the soup is almost done — float globs of the dough on top, cover the pot with a lid, and steam for about 10 minutes.
2010 AEC *All Rights Reserved*")
2010 AEC *All Rights Reserved*")
2010 AEC *All Rights Reserved*")
2010 AEC - All Rights Reserved")
2010 AEC *All Rights Reserved*")
Hearty Chicken Soup
– adapted from The Perfect Recipe
3 T vegetable oil or chicken fat
2 medium onions, cut into small dice
1 whole chicken (about 5 lbs.; add extra necks and/or wings if your bird is smaller)
2 bay leaves
1 large carrot, sliced 1/4 inch thick
1 celery stalk, sliced 1/4 inch thick
1/2 teaspoon dried thyme leaves
1/4 cup minced fresh parsley leaves
Salt
Dumplings
– adapted from Joy of Cooking
1 3/4 cups all-purpose flour
1/2 tsp salt
3 tsp double-acting baking powder
6 T chilled butter
3/4 cup plus 1 T milk
Cut up the whole chicken as if you were going to cook it in parts, splitting the breast into two pieces, but keeping the meat on the bone. (Cooking for Engineers has a nice post on breaking down a chicken. Alton Brown also does a good tutorial, although he takes the breast meat off the bone.)
Set aside the breasts and use a cleaver or poultry shears to hack the rest of the chicken — including the back, neck, and feet if you have them — into 1- or 2-inch chunks. Cut through the bones!
Heat the oil or fat over medium-high heat in a large soup pot. Add half of the chopped onion and all of the chicken pieces except the breast. Sauté until the chicken is no longer pink (I like to see some brown on the chicken pieces, but that can be tough to do in a crowded pot. Be careful not to burn the onions!). Reduce heat to low, cover, and simmer until the chicken releases its juices, about 20 minutes. Increase the heat to high and add 2 quarts of cold water, along with the chicken breasts, 2 teaspoons of salt, and bay leaves. Bring to a simmer, then cover, reduce heat to low and barely simmer until chicken breast is cooked and the broth is rich and flavorful, about 20 minutes.
Skim the fat from the soup and reserve it, then remove chicken breast from the pot and set aside. Strain the broth into a large bowl and discard the rest of the chicken pieces and bones. When the breast is cool enough to handle, remove the skin, and then remove the meat from the bones, shredding it into bite-sized pieces. Discard the skin and bones.
Return the pot to medium-high heat. Add 2 to 4 tablespoons of the reserved chicken fat, the remaining onion, the carrot and the celery, and a pinch of salt. Sauté until softened, about 5 minutes. Add thyme, broth, and shredded chicken. Simmer until the vegetables are tender and the flavors meld, 10 to 15 minutes.
If you like pasta, you can add two cups of egg noodles and cook until tender. Taste the soup and correct the seasonings — it will almost certainly need more salt. However, be careful with the salt if you’re going to add dumplings, as most dumpling/biscuit dough has salt in it somewhere… and I wouldn’t do both dumplings and noodles.
To make the dumplings, put the flour, salt, and baking powder in a food processor and pulse until well mixed. Add the butter, cut into tablespoon-sized chunks. Pulse until thoroughly mixed. Add the milk and pulse until the dough comes together. Drop globs of dough from a spoon onto the surface of the soup. Cover and simmer until the dumplings are cooked through, approximately 10 minutes.
Sprinkle with the parsley and serve.
Farmers and food artisans who created the ingredients for this week’s meal:
Spring Hill Cheese Company, Petaluma: butter
Soul Food Farm, Vacaville: chicken
Guisto’s Vita-Grain, South San Francisco: sea salt, flour
Catalán Family Farm, Hollister: onion, celery
Straus Creamery, Petaluma: milk
…and our own homegrown thyme, carrots, bay, and parsley
(Exemption: baking powder)
cookbooks, cooking, Dark Days challenge, locavore, recipes
8 Comments »
Posted by Cameron on 08.02.09 8:59 AM
 We were caught unawares, but isn’t that how it always happens? It seemed an innocent enough Sunday cruise through the Marin Farmers Market, looking for the coming week’s dinners. With a Marin Sun Farms chicken and some Devil’s Gulch pork chops already safely tucked away, we drifted into the Santa Rosa Seafood tent and were suddenly entranced.
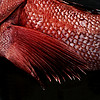
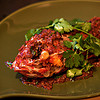
Odysseus could hardly have been more enraptured by the Sirens than we were enchanted by the beautiful, sleek, glossy-eyed fishies staring out from their beds of crushed ice. Sorting out which finny critters had been caught locally took some shouting between the guys working the floor and the fishwives (well, hell… what else are you going to call them?) gutting customers’ orders, but eventually we learned that the bright red, medium-sized rosefish had been hauled out of the water near Monterey. Not only were these guys beautiful, they were also just the right size for one of the few Thai dishes that I can claim as my own: whole fried fish.
Now, this is no batter-dipped chip buddy — it’s an entirely different kettle of… er… fish. A typical batter crisps up while leaving the fish underneath tender. But to cook a whole fish Thai style, you cut a series of deep slashes in its flanks, dust it with tapioca starch and drop it — fins and all — into hot oil for an extended bath: 20 minutes or more. This treatment drives the water out of most of the meat, turning it into a delicious, chewy, crunchy treat that comes off the skeleton in bits that are perfect for dipping in tamarind-based hot sauce. I’ll leave it up to you whether to let your guests in on the secret treats: The fins and tail (and in some cases the exposed bones) become as crunchy as potato chips, and there are plenty of succulent bits to be had in and around the head.
But our story isn’t quite done yet. We were within a hair of being able to make this our One Local Summer dinner for the week, but the sauce recipe calls for tamarind — not exactly a Bay Area native. Fortunately, I roll with the McGuyver of the Kitchen, who suggested that (local) pluots combined with lime juice would bring the necessary tang and body to our dipping sauce.


Crispy Fried Fish with Chili-Tamarind Sauce
– adapted from a recipe by Kasma Loha-unchit
A 1-1/2# firm, white-fleshed fish (such as snapper or perch), scaled and cleaned
1/4 tsp sea salt
1/8 tsp ground white pepper
8 cloves garlic, minced
4 fresh red jalapeño or Fresno peppers, minced*
2 shallots, minced
1-inch section fresh peeled fresh ginger, minced fine
1 T minced cilantro roots (or stems)
10 white peppercorns
2 to 3 cups peanut oil (for frying)
3 to 4 T tapioca starch
2 to 3 T Thai fish sauce
1/2 cup thick tamarind puree
1 T palm sugar, or more to taste
1/2 cup Thai basil leaves
A few sprigs of cilantro or Thai basil for garnish
2 to 4 Thai bird chiles, sliced thin, for garnish
Check to see that all the scales have been removed from your fish, and that the innards/guts are removed. Using a sharp knife, cut 3 to 5 deep gashes (depending on the size of the fish) in each side of the fish. The cuts should be at a 45-degree angle to the midline of the fish, with the top of each cut closer to the head and the bottom closer to the tail. Rinse the fish, drain, and pat dry. Rub evenly with a thin coating of salt and white pepper. If the fish has been refrigerated, let sit out up to an hour to warm to room temperature before frying.
Mix the garlic, peppers, shallots, ginger, and cilantro roots/stems. Using a large, heavy mortar and pestle, pulverize the peppecorns. Then add the minced aromatics, stir to mix well, and pound to a smooth paste.
Heat the oil in a wok over high heat until a bit of tapioca starch (or other test tidbit) dropped in the oil begins to bubble almost immediately. Coat the fish with a very thin layer of tapioca starch, and slip it into the oil. Fry the fish, turning it and ladling oil over it as necessary, until it is browned and crispy on both sides from head to tail (about 10 minutes on each side). Manage the flame to keep the oil bubbling vigorously, but not frantically, so that the fish can crisp thoroughly without burning. Remove the fish from the oil and cool on a wire rack for a few minutes before placing on a serving platter.
Pour off the oil from the wok, except for two tablespoons. Add the pounded chili mixture and sauté over medium heat for 2 to 3 minutes. Add fish sauce, tamarind, and palm sugar until the spicy, sour, sweet, and salty flavors are equally balanced. The sauce should be the consistency of a thick salsa — thin with water if it becomes too dry. Cook a minute to blend the flavor, then stir in the basil and cook just enough to wilt.
Spread half the sauce evenly over the fish and the other half along sides of the platter. Garnish with cilantro or Thai basil sprigs and the sliced chiles.
* Note: Do not seed the chilies unless you wish the sauce to be mild. For a medium-hot dish, remove the seeds from half the chilies.
Farmers and food artisans who created the ingredients for this week’s recipe:
Santa Rosa Seafood, Santa Rosa: Rosefish (Monterey-caught)
Hunter Orchards, Grenada: Garlic
Xiong Farm, Fresno: Thai bird chiles, Fresno chiles, ginger
Dirty Girl Produce, Santa Cruz: Shallots
Kashiwase Farms, Winton: Pluots
Paradez Farms, Exeter: Limes
…and our own homegrown Thai basil and cilantro
locavore, One Local Summer, recipes, Thai
3 Comments »
Posted by Cameron on 07.10.09 9:08 AM

Originally posted on the Tales Blog, where we’re working with many other cocktail bloggers to cover Tales of the Cocktail, 2009.
As someone who has been to my share of trade shows and conferences, I can tell you that the phrase “convention lunch†is enough to strike fear into the heart of the boldest traveler. But this is Tales of the Cocktail, which is about as un-convention-al as it gets. You can count on a good time in the seminars, tasting rooms, and party rooms, and then stroll out to some seriously good food.
Yesterday was the perfect example. We rolled out of bed, still on Pacific Time and fuzzy from the previous night’s festivities, cleaned up a bit, and then hit the bricks, aiming for the river, Cafe du Monde, and beignets with cafe au lait. The beignets come three to a plate, snuggled into a pile of powdered sugar that looks like nothing so much as the scene in the third act of Scarface where Tony Montana plunges his face into a mountain of cocaine. Instead of our noses, we plunged our beignets into the fluffy white mound while a singing, trumpet-playing entertainer performed “Down by The Riverside,†“Danny Boy,†and other feats of musical daring for the amusement of passers-by.
On our way back to the hotel, our eyeballs vibrating ever so slightly from the sugar buzz, we realized that our “lunch†break wouldn’t come until 2:30, and that we needed something a bit more substantial to carry us through the day. So, we stopped at Johnny’s Po-Boys and split an egg and bacon po’boy, washed down with a couple of Barq’s root beer sodas. Mother’s may get more attention, but for our money, Johnny’s is the spot. It’s a place of wonderful mysteries. How do they manage to get the rolls to be tender, chewy, and flaky all at the same time? How can they offer fried chicken with a homemade biscuit and white gravy for $2.50 a plate? And how am I going to manage to get here enough times this week, given all the other great places that we’ll be eating at?
Back at Tales, we soaked up some knowledge and tasted some spirits, but I have to admit that I was already looking forward to our next food foray. We roped in Marshall from Scofflaw’s Den and headed back into the Quarter, aiming for Central Grocery and its famous muffuletas.
I had my first Central Grocery muffuletta at last year’s Tales, and it was a madhouse. There was a line out the door, and every horizontal surface was staked out by someone eagerly devouring one of the sandwiches. Today, there were no crowds, which made the lunchtime experience much more civilized. But even if it were wall-to-wall people, it wouldn’t have mattered. If there’s anything wrong with loving a sandwich the size and shape of a hubcap, spread with oily, tangy olive salad and filled with all sorts of good things (salami, capicola, and provolone, just to name a few), I don’t want to be right.
The best part? The day wasn’t over, much less the week. We have got to get to Green Goddess, and there’s a slew of other stuff on the schedule. And no matter where we are I’m pretty sure that there’s another plate of beignets calling my name, down by the riverside.


New Orleans, restaurants, Tales of the Cocktail
6 Comments »
Posted by Cameron on 05.23.09 8:55 PM
 A couple of weeks ago, I ended up talking to a reporter for the SF Chronicle for a story on urban gardening, and had a grand time bending her ear about my recent adventures. But after I rang off, my lovely and talented wife gently reminded me that our own home-grown publication hadn’t seen any garden news in… er… months.
Let’s see… where were we? In mid-January, everything in our newly built beds looked very promising: The radishes had sprouted, the onion sets were sporting little green mohawks, and the peas were “ready to wrestle a very tiny trellis into submission.”
But by mid-February, though the peas were still rocking and rolling, everything else had stopped growing. It was a completely pathetic sight: Rows of tiny green leaves surrounded by what looked like miles of grey-brown wasteland. By mid-March, the peas really did need some kind of trellis, but everything else was basically unchanged. I started to wonder if cold weather and frost had nuked my seedlings. Ridiculous, sure, but what did I know?
That was the start of a spring spent learning how to turn raw dirt and compost into a place where plants actually want to grow. I reconfigured the drip irrigation system three times, then watered by hand. I added more compost, cocoa bean mulch, fish emulsion, greensand, and finally a general purpose organic fertilizer. Basically, I followed the same approach as new parents confronted with a crying baby — “Is it thirsty? Is it hungry?” — except I was getting a lot more sleep.
I replanted the radishes and beets in what I hoped were more hospitable digs (ha!). But my thrill at the quick flush of new growth turned to fury as I realized that the new seedlings were being eaten down to the stem almost as soon as they emerged. As if that weren’t enough, I found that by filling raised beds with soft compost and soil, I had inadvertently opened a five-star refreshment facility for the neighborhood cats.
Imagine the thousand scenes where Clint Eastwood’s eyes narrow to a hard, weatherbeaten squint behind a loaded sixgun, and you’ve got a picture of my state of mind. The words “critter” and “varmint” entered my vocabulary. I closed the kitty spa by installing a low fence around the beds, but that didn’t stop whatever was chewing on the delicate sprouts. I embarked on nightly expeditions armed with a flashlight to try and catch insectile marauders in the act. That was the worst part: I couldn’t find any evidence of what was doing the damage. At last, I spotted a lone earwig scurrying across the beds late one night. Skeptical but desperate, I put out small tins full of beer as traps; after a couple of days, I was happy man. Those little prehistoric-looking summbitches loves them some suds, but they sure can’t swim a lick.
By this point it was April and though the peas were swarming up the second trellis I’d built (they didn’t like the first one — who knew that peas could be divas?), the rest of the plants looked like they’d survived a war. So I did the sensible thing: I planted more stuff that I’d never successfully grown before. Pickling cucumbers and cornichons took up residence in the beds. On the edges of the yard — in the sunniest, warmest spot along our northern fence — I put in St. Pierre and New Girl tomato plants, along with a brace of Kentucky pole beans around the corner. I adapted a yard composter to serve as a potato tower, populating it with seed potatoes that had returned with us from London. And although several of the cucumber plants didn’t thrive, everything else seems reasonably happy and healthy.
Back in November, when I first contemplated pulling up the slate tiles of our beautiful (though completely unused) patio and dropping a bunch of cash on wood, dirt, and compost, I slowed my racing heart by remembering that I had a lot to learn, that the first year of the garden would be a pure lark. Even so, I had no idea how difficult and how rewarding this project would be. On top of finding out basic stuff about what makes plants happy, I’m getting to know our back forty (feet) and its little ecosystem: Where the sun shines and where it doesn’t, what’s in the soil and what isn’t, and what sort of critters and varmints (good and bad) are crawling around.
One of the more amusing revelations that I’ve had along the way is that when it comes to our patch, nobody knows much more than I do. Last week, I decided that I wanted to put asparagus along the eastern fence line, but I was worried that it was too late in the season to plant the crowns. I fired off an e-mail to an expert source and got a response that boiled down to, “Sounds like a great idea! It might work…but then again it might not. Give it a try!” They say that in politics that if you want a friend, you should get a dog. In gardening, if you want certainty, get FedEx or get religion.
But the lack of guarantees may be what makes the harvest so special and satisfying. I still can’t quite believe it when I see the (very small) piles of radishes on the counter that went from seed to salad not thirty feet from the kitchen sink. I’ve got a long way to go, but the path ahead is one of the most inviting that I’ve ever seen. Every single peapod I munch tastes like victory.


garden
14 Comments »
Posted by Cameron on 01.06.09 10:09 PM
 It wasn’t easy to leave our newly planted crops germinating all on their lonesome as we took off for two weeks of well-deserved R&R on the far side of the Atlantic, but it was probably for the best. If nothing else, we were saved the agony of daily garden inspections in search of any signs of life. I briefly considered pointing a webcam at the back yard before we shuffled off to London, but discarded the idea after realizing that it would seriously creep out the housesitter, and that the camera’s resolution is so poor that I would be lucky to be able to pick out the raised beds, let alone any tiny green sprouts.
So we returned from Albion with zero information, but plenty of hope. We dropped our luggage, played with the dogs for a minute or two, and then raced out to see if our backbreaking labor (ha!) had shown results. Happily, it had.
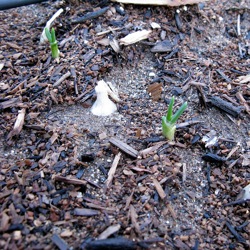
The radishes have come up like absolute gangbusters, sprouting delicate green tops and putting everything else to shame. The pea vines are running a close second, with two lines of tough, wiry — and at less than half an inch tall, seriously cute — stems that already look like they’re ready to wrestle a very tiny trellis into submission. The mixed lettuce is up and it’s kind of amazing to see how different all the different types look already, even though the largest leaf can’t be more than two millimeters across. A few of the onion sets are showing signs of life, and we even have a couple of green sparks showing in the leek trench.
So far, the laggards are the onion seeds and the beets. I’m not holding my breath on the former — everything that I’ve read says that onions are tough to grow from seed and that even when they are successful they take forever to germinate. I’m a bit puzzled about the beets, as they’re supposedly unfazed by cool weather, but it’s still pretty chilly at night and the seeds have only been in the ground for 20 days, 15 hours, and 33 minutes. But who’s counting?
And yes, that is frost that you see on the seedlings in the pictures. The Sunday morning after our first night back arrived with a coating of frozen crystals. A few days later, none of the little ones seem any the worse for wear. Since then, I’ve also discovered that I can stop frost from occurring at all simply by covering the plants to protect them — much the way that carrying an umbrella prevents rain from falling. Me and my magical frost cover are available for weddings, birthdays, and bar mitzvahs.


garden
8 Comments »
Posted by Cameron on 12.16.08 1:46 PM

I have never been an instinctively organized person. I tend to leave planning until the last minute, overestimate (and overbuy) the necessary materials, and then fly by the seat of my pants. Most of the time my “method” works, but it can be wasteful. It’s also hard to define and evaluate what I did in retrospect, so that I can do it better next time.
I have been trying like heck not to take my typical approach with our nascent vegetable garden. From the construction of our new raised beds (hammer and shovel account coming in a future post, I promise) to planning plantings, I have actively encouraged my inner project manager to come out and play.
However, I am acutely aware of the fact that what I consider a “plan” often sounds like Marty McFly’s instructions to the 1950s dance band in Back to the Future: “Okay guys, this is a blues riff in B. Watch me for changes and try and keep up, okay?” So when Genie, aka the Inadvertent Gardener, volunteered to lend a hand with our very first planting, I was primed to overthink the entire event. And boy, did I.
I read all of the instructions on the seed packets, inside and out, cross-referencing the information with my two new best friends, Pam Peirce’s Golden Gate Gardening and Jeff Ball’s 60-Minute Vegetable Garden. I gazed at our new beds, making calculations about relative amounts of sun and shade, and searched the Web for general planting instructions, raised bed ideas, and wide-row planting theory. I made a list of the vegetables that I wanted to grow, organized by the distance between rows that each required. I drew up a small diagram of my beds (to scale, of course), illustrating what would go where. And, when Genie asked what time she should arrive on Saturday, I thought about how much time planting might take and left a generous margin for error, suggesting that I pick her up from the BART station at 1pm.
Saturday morning, I laid out all of my garden tools (a shovel, a long rake, a hand trowel, and a hand rake) and the seed packets, clipped together. It wasn’t until Genie arrived and I started describing the work plan — illustrated with my hyperactive little meth-junkie diagram — that I started hearing the loose screws rattling around in my tiny little head. I hauled in the reins and ground to a halt, biting off the suggestion that we measure the distance between rows. Folks, we’re talking about two small raised beds, each almost exactly eight feet long and four feet wide; surrounded by and aligned with stone tiles that are each almost exactly two feet square. About the only thing that we didn’t have to work with was a grid printed directly on the dirt. Somewhat sheepishly, I handed Genie a rake and suggested that we start loosening the soil in the beds, which had settled and crusted over a bit in the two weeks since I installed them.
About an hour later, I was feeling like an even bigger dork. The planting that I thought would take most of the afternoon? Done. Actually, Genie finished her bed in about 30 minutes and spent the rest of the time taking pictures of me stumbling about. Right now, somewhere, my über-gardener mom is looking down on me and laughing her butt off. With love, sure. But laughing nonetheless.
But you know what? We now have a bunch of dirt with seeds in it! We’ve got three kinds of onions in (two from seed and one from sets) — some that I’m planning to pull as scallions. We also planted three rows of mixed beets, two rows of French breakfast radishes and another of cherry radishes, a row of leeks, two of peas, and one of mixed lettuce.
And to tell the truth, I could use more “chore” days like this one. Anita made delicious lunch of Reuben sandwiches with Marin Sun Farms pastrami, which we ate with Laura’s dilly beans and Sean’s pickles. We spent the rest of the afternoon talking, playing with the pups, sipping beer, and kibitzing in the kitchen.
After the sun went down, the three of us washed our faces, put on our city duds, and headed off to SPQR, where red wine, non-stop wisecracks, at least six different kinds of pork, and a surprise fireworks display (seen across the bay from the top of Fillmore Street as we waited for our table) were the order of the evening. If there’s a better, happier, more karmically charged way to kick off a new garden, I cannot imagine what it would be.


garden, other blogs
11 Comments »
Posted by Cameron on 11.09.08 11:05 AM
 Knowledgeable guitarists say that tone is in the fingers. In other words, if I were to play Eddie Van Halen’s guitar through his stage rig, I would sound like… Cameron playing Eddie Van Halen’s guitar. I wouldn’t look like him either, even though I can make all the wide-eyed guitar hero faces.
I’m beginning to think the same thing holds true for recipes. I made biscuits and sausage gravy for breakfast this morning, which I do every few weeks. I usually forget which recipe I use, so I spend about ten minutes combing through our cookbooks. I have tried biscuit recipes from the back of mix boxes (long ago), the Internet, and various cookbooks. But while they all have their own idiosyncrasies, when I make them they always taste like… well… my biscuits.
Today, I used the recipe from the Joy of Cooking, and I am here to tell you brothers and sisters that when it comes to basic American staples — particularly breakfast fixin’s like waffles, French toast, and biscuits — that Rombauer gal has got it wired. The Joy recipes are simple, direct, and every bit as tasty as the complicated shenanigans you find elsewhere. Especially from that uptight bastard in the bow tie. I mean my god, Kimball: I am not acidulating milk and using two different types of flour at 9am on a Sunday morning, even if Martha herself is coming for breakfast.


Rolled Biscuits
adapted from the Joy of Cooking
1-3/4 cups sifted all-purpose flour (I don’t bother sifting, and it’s never hurt)
1/2 teaspoon salt
3 teaspoons double-acting baking powder
4 to 6 tablespoons chilled butter
(Joy says that you can use shortening, but… ew. Might try lard, though.)
3/4 cup milk
Preheat oven to 450 degrees. Whisk the dry ingredients together in a bowl and then cut in the butter. (Doing this by hand is picturesque, but a huge pain in the butt, especially on the first cup of coffee on a Sunday morning. Get smart and get out your food processor and metal blade. Dump in the dry ingredients, pulse them a couple of times, then drop in the chilled butter, which you’ve cut into 6-8 cubes. Pulse again 10 to 15 seconds, or until the mixture looks like crumbs.)
Add the milk and mix (or pulse) until you have wet dough. Turn the dough out on a floured surface, knead very gently 5 to 7 times, then roll out 3/4 inches thick and cut biscuits. Bake on an ungreased pan for 12 to 15 minutes, or until the tops are brown.
baking, breakfast, cookbooks, recipes
8 Comments »
Posted by Cameron on 10.13.08 10:46 PM
 If there is a drink out there with fewer redeeming qualities than the Jäger Bomb, I can’t imagine what it is. Seriously folks, this drink is a bad idea. It tastes like cough syrup, it’s loaded with sugar, it packs enough caffeine to instantly add fifty points to your heart rate, and one of the main ingredients is made entirely of industrial chemicals.
And so, in honor of Stevi’s Mixology Monday topic, Guilty Pleasures, I’m horrified to share with you that I’m completely, utterly addicted to the Trailer Trash Speedball, the Turbojäger, the Flying Hirsch, La Perla Negra: The Jäger Bomb.
I picked up this dirty little habit during my tour of duty as a guitar player for Seattle-area cover band Bad Alibi. For the first three months, I was fastidious about not drinking during performances. To tell the truth, for the first month, I was too panicked to even think about trying to play with a buzz on, which amused my band mates tremendously. They rarely got out of control, but every set was accompanied by beer and, to tell the truth, if our drummer wasn’t stoned, he couldn’t keep time at all.
Before the third and final set of the evening, one of the Alibi Boys would usually buy a round of Jäger Bombs. At first I declined to take part in the toxic trainwreck, but eventually I thought, “Don’t knock it if you haven’t tried it.â€
Like any destructive obsession, ritual is an important part of the Jäger Bomb. A shot of Jägermeister, an herbal liqueur, is served next to a pint glass containing half a can of Red Bull energy drink. You drop the shot glass into the pint glass and chug the mixture. Think of it as a millennial boilermaker.
As I climbed back on stage after my first ever Jäger Bomb, I immediately understood the appeal. Our third sets usually ran from midnight to 1:45am. Fridays weren’t too bad, but we always played two nights in a row and the third set on Saturday could be tough. No matter how big the crowd was, by 12:30, the entire room was completely blasted. By 1am, the energy would start to fall off, and by 1:30, the only people upright were usually us and the bar staff.
 This is all by way of saying that if you run around playing high voltage rock and roll late at night, the Jäger Bomb starts to make a lot of sense. One produces a high, fine, jittery feeling, and two will definitely get your motor running. Drink three in quick succession and you might as well hand the bartender your credit card and have them call the cops now, just to save time.
After about a year and a half of playing 5 hours a night, 2 nights a week, 3 weekends a month in roadhouses anywhere from 45 minutes to 2 hours outside the city, all while holding down a full time corporate day job, my attitude towards rock godhead changed. The crowds were getting smaller, the drives were getting longer, and there is absolutely nothing fun about breaking down the stage at 2am. When I left the band, I mostly stopped drinking Jäger Bombs, as it’s not the sort of thing that you order in polite company.
But every now and then I let the inner Neanderthal come out to play. I drop the shot into the glass, and fire back the mixture. As the tight rush crawls up my spine, I close my eyes and remember when the lights flashed, the fog billowed, and—with one foot on the monitor and a snarl on my lips—I delivered the mighty rock thunder to a sea of dancing hooligans.


Jäger Bomb
4oz of energy drink (roughly 1/2 can of Red Bull)
1 shot Jägermeister
Pour the energy drink in a pint glass. Drop the shot in the pint glass and drink the whole mess down. Rock on.
bar culture, Drink of the Week, drinks, Mixology Monday, recipes, Seattle
13 Comments »
Posted by Cameron on 07.28.08 10:01 PM
 Sweet spirits of niter, did we get plums this year or what? Last year, our little whip of a tree served up a double dozen of the sweetest, tartest, juiciest globes that we could have ever hoped for. This year, that little whip filled out and buried us under an avalanche of purple fruit.
We saw Plumapalooza coming when we had to prop up one of the tree’s lower branches. The load of ripening plums bent it into a wicked arch, forcing the tip down so far that it touched the ground. However, it’s one thing to gaze admiringly at branchloads of red and purple glory. The reality of harvest is another thing entirely.
Toward the end of June, the very first volunteers hit the ground. Every day, we would gather the fallen and tug gently at likely followers still hanging on the branch. Five a day turned into ten and in a week’s time, we were gathering up between fifteen and twenty plums every morning and every night. By the time it was all over, we figured that we reaped 30-40 pounds of fruit.
Which naturally begged the question of precisely what the hell we were going to do with 40 pounds of plums. Finding a solution seemed especially pressing in the early stages of the deluge as we carefully picked yard bark out of drops and sorted the fruit into piles of Perfect, Not-so-perfect and We-love-you-anyway on the countertop. Ultimately, we knew that we would have to turn to preserves or some other solution that involved canning, but we weren’t ready to go there just yet.
As I stood in the kitchen one weekend, chain-eating plums and staring at the latest load, Anita reminded me that I had talked about making pâte de fruits before the plums started thumping down. Brilliant! Why didn’t I think of that? I checked around and found a few recipes, most of which called for pectin, but Anita sussed out a recipe in the San Francisco Ferry Plaza Farmers Market Cookbook that was nothing but plums, a little lemon juice, and a *lot* of sugar.
My first go at being a candy maker turned out pretty well, but there were some bumps along the road, mostly related to the fact that the recipe instructions about how long to cook the plum/sugar mixture before pouring it into a pan to set didn’t match up with my real-world experience: “Cook over low heat, stirring constantly, until the fruit reduces and thickens and begins to hold together as a mass, 20 to 30 minutes.”
Obvious, right? Easy? Not for this knucklehead. I stood in front of the stove stirring that pot nonstop for THREE FREAKING HOURS while the contents went from a thin purple soup to a bubbling syrup that I — exhausted and convinced that I had made a fatal error somewhere — finally abandoned to the tender mercies of the candy pan.
On behalf of my fellow kitchen idjits, let’s diagnose the sentence that was my nemesis. Cook over a low heat? My friends, it’s probably possible to boil a pot of coffee with a Bic lighter, but it’s going to take a long damn time, and when you’re trying to evaporate a quart or so of liquid, you need something a bit more brisk than low heat. Next time, I’ll be less tender with the flame during the early proceedings.
Second lesson: use a comfortable spoon. For reasons that are now unclear to me, I chose a metal spoon for my stirring utensil (Something to do with not staining the wooden spoons? Maybe? I don’t know. Leave me alone.). All I know is that after several hours of making like the witches in Macbeth, the unforgiving handle had given me a blister.
Last point: I don’t know about you, but when I think of something “holding together as a mass,” I expect to be able to haul out a serious hunk of glop when I raise up the spoon. Au contraire, mon frere. My pot full of plum sweetitude thickened to a syrupy consistency and then stopped. I kept at it, though, stirring away like Jamie Oliver on Quaaludes until I smelled the sugar caramelizing and thought to myself, “Self, if you keep going, you’re going to end up with plum-flavored Jolly Ranchers. If it ain’t done now, it ain’t gonna be done.”
It was done. After setting, cooling, cutting, and dusting with sugar, the final product was chewy, tart, and had the unmistakable twang of sugar that’s had a comfortable and extended acquaintance with the flame. It was good, and the piles of plum candy disappeared more quickly than I would have believed possible, especially when paired in gift bags with Anita’s homemade marshmallows.


Plum Candy
– adapted from the San Francisco Ferry Plaza Farmers Market Cookbook
4 pounds plums, pitted and chopped
2 T water
Juice of 1/2 lemon
About 4 cups sugar
In a large, heavy enameled cast-iron or other nonreactive pot, combine the plums, water, and lemon juice. Place over low heat and cook until the fruit is very soft, about 20 minutes.
Remove from the heat. Puree the plum mixture by forcing it through a fine-mesh sieve or food mill fitted with a fine screen held over a bowl. Measure the puree, return it to the pan, and stir in an equal amount of sugar. Cook over low heat (ha!), stirring constantly (ow!), until the fruit reduces and thickens and begins to hold together as a mass, 20 to 30 minutes (bullshit. see above.).
Line a 9-by-12 inch rimmed baking sheet with parchment (the original recipe says plastic wrap, but I was afraid that it would melt) overlapping the edges. Pour the plum paste onto the lined pan and spread into an even sheet with a rubber spatula. Let cool, cover, and allow to stand at room temperature for 48 hours. The paste will become firm.
Invert the pan onto a cutting board, peel off the parchment, and cut the paste into about 36 small squares. Arrange in layers on waxed paper and store in an airtight plastic container at room temperature.
dessert, garden, locavore, preserving & infusing, recipes
23 Comments »
