Posted by Anita on 08.10.09 8:13 PM
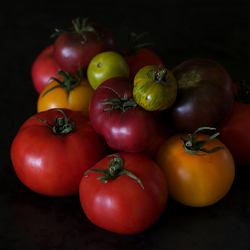 It’s finally happening: We’re finally harvesting enough fresh vegetables from our garden to make a meal, or most of one. True, this week we still bought tomatoes — although, look how gorgeous they are… can you blame us? By next week at this time, when our first branch of tomatoes is fully ripe, we’ll be able to make this recipe without much help from the farmers. This time around, we’re proud enough that half the bulk of our One Local Summer dinner for the week came straight from the yard.
To celebrate this harvest milestone, I wanted to make sure that we found a recipe that wasn’t diluted with a lot of extraneous stuff. Looking at our bumper cucumber crop, I immediately though of Greek salad, but every recipe I found was almost half lettuce — which seemed a little counter to the occasion. Our lettuce patch is eking along pretty well in our mild coastal climate — we’ll have enough to spare for the BLT Challenge later in the month — but it seems a little sacrilegious to bulk up fresh tomatoes and cucumbers with a bunch of leaves. So I improvised a simple salad, and both of us were extremely happy with the results.
We served our garden bounty alongside a coil of grilled Basque-style sausage from our friends at Fatted Calf, and scooped everything up with a batch of homemade pita bread, made with a mix of locally grown whole-wheat flour (from Eatwell Farm) and locally milled Giusto’s bread flour. It was, if I dare say so, a feast fit for a Mediterranean deity.


Greek Salad
3/4 pound tomatoes, cut into chunks (about 2 cups)
2 cups cucumber, peeled and seeded if desired, and cut into chunks
1/2 cup diced sweet red pepper
1/4 cup thinly sliced red onion
3 T extra-virgin olive oil
1-1/2 T red wine vinegar
3 T chopped Italian parsley
2 T fresh mint
1 T fresh oregano
1 T chives
—
1/4 cup crumbled feta cheese (about 2 ounces)
Toss all ingredients except feta in medium bowl to blend. Gently mix in cheese, and season with salt and pepper.
Farmers and food artisans who created the ingredients for this week’s recipe:
Lucero Organic Farms, Lodi: Heirloom tomatoes
Capay Fruits & Vegetables, Capay: red peppers
Catalán Family Farm, Hollister: Red onions
Bariani, Sacramento: Olive oil
O Olive Oils, San Rafael: wine vinegar
Spring Hill Cheese Company, Petaluma: Feta cheese
…and our homegrown cucumbers, parsley, mint, oregano, and chives
garden, locavore, One Local Summer, recipes
7 Comments »


Posted by Anita on 07.26.09 11:30 PM
 This week, we had so much going on that we lost track of our One Local Summer meal entirely. It’s not that we didn’t enjoy lots of fresh, fabulous treats from the market and our garden, we just weren’t diligent about documenting any of them. Many dinners were repeats of past OLS post, or just the kind of no-recipe suppers thrown together on a summer evening.
We’d planned to make up for lost time at the end of the week, but other things came up — a touch of a sore throat, followed by a last-minute weekend trip — and we found ourselves empty-handed for this week’s roundup.
Luckily, we had something we’ve kept in our back pocket in case of just such an eventuality. We first tossed this simple salad together back at the end of May, just as we were reaching the end of our first shelling pea crop. The plants had begun to die off, and we were ready to turn them back into the soil and plant another crop. But there were just enough peas left for one last splurge.
And actually, it’s the perfect salad to enjoy at the beginning of a pea harvest, too — a place we find ourselves this week, with our second pea crop — or any other time you’ve got a mixture of mature peas, immature pods, and a few small tendrils. If you’re a cleverer gardener than we are, and you’ve mastered the art of successive plantings, you can even use the thinnings from your next batch of peas, too.
But even if you buy every last stitch from the farmers market, you’ll be rewarded with a light, fragrant salad, equal parts crisp and creamy.


Pea and Radish Salad with Feta
– loosely adapted from Bon Appetit
1 tsp cumin seeds
1 T fresh lemon juice
1/2 tsp honey
2 T extra-virgin olive oil
3 springs fresh thyme, leave stripped
1-1/2 cups fresh shelled peas
6-10 snow peas (or immature homegrown peas), julienned
5-7 medium radishes, thinly sliced
1/2 cup crumbled feta cheese (about 2 oz)
1-1/2 cups pea sprouts or very tender pea tendrils
Toast the cumin seeds in a small skillet over medium heat until aromatic, about 2 minutes. Cool the seeds, then grind in a spice mill or coffee grinder. In a small bowl, whisk together the dressing ingredients (cumin to thyme); season to taste with salt and pepper, keeping in mind that feta can be quite salty.
Blanch the peas in boiling salted water until just tender, about 3 minutes. (Timing will vary based on freshness, age, and size of peas.) Scoop peas out of the pan and into an ice-water bath. Repeat blanching with the snow-pea strips; this will take about 1-2 minutes.
Drain peas and snow pea strips very well. Combine them in a medium bowl with the sliced radishes and crumbled feta. Drizzle with about half the dressing and toss. Taste and add more dressing, salt, and pepper as needed.
Divide pea sprouts or tendrils among 2 or 3 wide salad bowls, and top with the dressed salad. Serve at once.
Farmers and food artisans who created the ingredients for this week’s recipe:
Marshall’s Farms, American Canyon: Honey
Bariani, Sacramento: Olive oil
Spring Hill Cheese Company, Petaluma: Goat feta
…and our own homegrown lemons, thyme, peas, and radishes
locavore, One Local Summer, recipes
5 Comments »
Posted by Anita on 07.19.09 10:22 PM
 At this time of year, when the garden’s finally kicking into high gear, and all of our favorite foods are in plentiful supply at the farmers market, I rarely pick up a cookbook, and hardly even use recipes.
The vast majority of our summer meals follow a dead-easy formula: A little bit of meat, usually rubbed or marinated and then seared on the grill; an unfussy starch, finished with a knob of fresh butter or a drizzle of olive oil; and big helping of vegetables, either in the form of a chopped salad or a simple saute. Usually, there’s fruit for dessert — maybe paired with ice cream or cookies, if we’re feeling fancy.
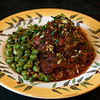
The few recipes that find their way out of the files are usually tried-and-true favorites, and this one is no exception. We’ve been making this succotash for nearly three summers now — it first appeared on the blog as a passing reference back in 2006 — and it feels like an old friend. We’re finally seeing peppers in the market, so we hauled it out for the first time this summer, and enjoyed it as the centerpiece of this week’s One Local Summer meal, alongside a grilled tri-tip with a Santa Maria-style rub (equal parts salt, pepper, and garlic granules, moistened with olive oil).
We’ve made some changes to the succotash recipe along the way, swapping out the original’s summer squash (which neither of us really likes) in favor of other summery flavors like green garbanzos or late-season peas. But no matter how many tweaks we make, it remains one of those tastes of summer that we anticipate all year long.


Summer Succotash
– adapted from Bon Appetit
1T extra-virgin olive oil
1 cup chopped onion
1 cup diced sweet red pepper
1-1/2 tsp fresh thyme leaves
2 garlic cloves, minced
4 ounces slender green beans, trimmed, cut into 3/4-inch pieces (~1 cup)
1/2 cup green garbanzos (or substitute mature favas or starchy peas)
1 cup fresh corn kernels (cut from 2 ears of corn)
2T cream
Heat oil in large skillet over medium-high heat. Add onion; reduce heat to medium and saute until beginning to soften, 2 to 3 minutes. Add pepper, thyme, and garlic; saute 1 minute. Add garbanzos and 1/4 cup of water; cover and cook until the garbanzos are just beginning to soften, 4 to 6 minutes longer. Add the green beans and saute until all vegetables are crisp-tender, about 4 minutes more. Stir in corn and cream, and saute until just heated through. Remove from heat, season with salt and pepper, and serve immediately.
Farmers and food artisans who created the ingredients for this week’s meal:Bariani, Sacramento: Olive oil
Everything Under the Sun, Winters: Red onions
The Peach Farm, Esparto: Red frying peppers
Hunter Orchards, Grenada: Garlic
Catalán Family Farm, Hollister: Green garbanzos
Pinnacle/Phil Foster Ranch, Hollister: Corn
Claravale Farm, Paicines: Raw Jersey cream
…and our own homegrown thyme and green beans
locavore, One Local Summer, recipes
6 Comments »
Posted by Anita on 07.14.09 12:33 PM
 One day a couple of weeks ago, I decided to make a batch of homemade kimchi using an extra head of cabbage I had knocking around. Of course, this simple use-it-up kitchen project required a trip across town to a Korean grocery store for the requisite red-pepper seasoning mixture, but I’ve got an anti-food-waste streak a mile wide.
In a bit of kitchen synchronicity, I’d been meaning to make our friend Matthew‘s recipe for Korean tacos — a recent trip to L.A. left us with a hankering for this hipster street chow but unable to stomach Kogi‘s ridiculous 3-hour lines — and kimchi seemed like a natural accompaniment.
Last weekend at the farmers market, our list was very short. Knowing we were heading off to New Orleans last Wednesday, we really only needed to make one dinner at home. Could we combine our Korean supper with our One Local Summer meal? Turns out, the recipe doesn’t require any exotic ingredients, and by stretching our challenge’s seasoning exemptions to include soy sauce and a small amount of sesame oil, we were able to source everything we need from within our 100-mile radius.
Of course, the best-laid plans often lead to disappointment, and my first batch of kimchi never really got the hang of fermentation. I tried again a few days later using a different recipe, and although it seemed headed in the right direction, the cabbage never released enough liquid, and the result was dry and funky.
But although I still haven’t found a kimchi recipe that works for me, that didn’t stop me from including it in our locavore feast. Turns out, there’s a locally made brand — King’s — that all the nearby Asian markets sell. It’s spicy and fresh-tasting, even if it’s not as beautiful or as romantic as the homemade sort.
This recipe also gave us a chance to try out the meat slicer we bought a few weeks ago. If you don’t have a fancy gizmo like ours, you may be able to ask your butcher to shave the meat for you. Or, you can freeze it briefly (although not until it’s completely solid) and use a very sharp knife to cut pieces as thin as possible.


Korean Rib-Eye Tacos
– adapted from Matthew Amster-Burton
3/4 pounds rib eye, sliced paper thin
1T soy sauce
1 to 2T sugar
1T minced garlic
2 tsp Asian sesame oil
1 tsp sherry or mirin
1 tsp water
—
1-1/2 tsp soy sauce
3/4 tsp lime juice
3/4 tsp toasted sesame oil
2 cups shredded romaine lettuce
1 cup shredded Napa cabbage
1/4 cup thinly sliced red onion
toasted sesame seeds
—
chopped avocado
kimchi, Korean red pepper flakes, or fermented chili paste
corn tortillas (6 to 10, depending on size)
Combine the meat with the rest of the marinade ingredients, and refrigerate for between 2 and 24 hours. Bring meat to room temperature, then cook under a broiler or in a well-heated skillet. If needed, chop into smaller, taco-friendly pieces.
Whisk together the soy sauce, lime juice, and toasted sesame oil. Toss the lettuce, cabbage, and red onion in a large bowl with half of the dressing. Add more dressing to taste, then garnish generously with sesame seeds.
Warm the tortillas over a gas burner or in a dry skillet. Top with meat, slaw, avocado, and your choice of spicy condiments.
Farmers and food artisans who created the ingredients for this week’s meal:
Marin Sun Farms, Point Reyes: Grass-fed pastured rib-eye steak
Hunter Orchards, Grenada: Garlic
Paradez Farms, Exeter: Limes
Marin Roots Farm, Petaluma: Romaine
Dirty Girl Produce, Santa Cruz: Cabbage
Mariquita Farm, Watsonville: Red onions
Will’s Avocados, Soledad: Avocados
Primavera, Sonoma: Corn tortillas
King’s Asian Gourmet, San Francisco: Kimchi
locavore, meat, One Local Summer, recipes
8 Comments »
Posted by Anita on 07.05.09 11:03 PM
 When I first read the recipe that served as the inspiration for this week’s One Local Summer supper in the September 2006 issue of Bon Appetit, I knew we would have to make it. The official name of the dish was the prosaic “Spanish Pork Braise”, but the real hook was rendered in 48-point type over a stunning photo of braised pork shanks and sunny garbanzo beans: “PORK x4”. Really, have you ever heard of a happier notion? Not just pork — pork four times over!
Of course, with September being the height of San Francisco’s Indian summer, the idea of a hearty braise heating up the house wasn’t really appealing at the time. But I knew, some foggy summer day in the future, I’d have the perfect recipe at hand.
Finding osso-bucco–style pork-shank pieces at the farmers market isn’t really an everyday occurrence (although Marin Sun Farms will do them by special order), so I never found myself hunting down the recipe. But then, last week, while browsing through my recipe file looking for a way to use up some porky odds and ends in the freezer, I rediscovered this captivating clipping. The pork shank I had on hand was whole — we’d brought it home from our pig-butchering class — but a braise is a braise is a braise. Even if pulled meat doesn’t look quite as nice as a neatly tied shank steak, it still tasted delicious.
The original recipe is served with a side of garbanzo beans dressed up with a sprinkling of gremolata. We were lucky enough to pick up fresh, green garbanzos at the market last week, and substituted them for canned, after a quick pan-poaching. If you’re wondering what to do with the starchy late peas you’re finding at the market, I suspect they’d made a great alternative, too.


Pork Times Four
– adapted from Steve Johnson’s Spanish Pork Braise, Bon Appetit
4 to 5 pounds bone-in pork for braising
(such as a whole pork shank, or 6 x 2-1/2-inch thick shank pieces, or a meaty soup bone plus large chunks of shoulder meat)
1/2 pig’s foot
1 to 2 links Spanish-style chorizo, sliced
2 T extra-virgin olive oil
2 large carrots, medium dice
1 large onion, medium dice
6 large garlic cloves, smashed
1/2 T chopped fresh savory (or 1T chopped thyme)
1 cup medium-dry Sherry
1 28-ounce can plum tomatoes in juice, tomatoes coarsely chopped
2 cups pork (or chicken) stock
3 dried ancho chiles, halved, stemmed, seeded
2 T tomato paste
1-1/2 tsp ground cumin
1 tsp ground coriander
—
2T olive oil
3 cups cooked garbanzo beans
1 large clove of garlic, minced
large pinch of saffron
1/4 cup chopped parsley
2 thin slices proscuitto or ham, minced
1/2 cup chopped toasted almonds
1T grated citrus peel, preferrably orange
Preheat the oven to 350°F. Sprinkle pork and pig’s foot with salt and pepper. Heat a wide Dutch oven over medium heat, and add the chorizo slices. Saute the chorizo, adjusting heat as needed to render the fat and brown the meat. Remove the browned chorizo to a plate using tongs or a slotted spoon. Increase heat to medium-high, and saute the pork until brown, turning to caramelize all sides. (Depending on the size of your pan, you may need to work in batches. If your chorizo is particularly lean, you may need to add some additional oil.) Remove browned pieces to a plate or baking sheet, and reduce heat to medium low.
Add carrots, onion, garlic, and herbs to the pan, and cook until onion softens, about 4 to 6 minutes. Add the sherry to the pan, and deglaze. Add the tomatoes and their liquid, stock, chiles, cumin, and coriander. Bring to a boil, and return browned meat, chorizo, and pig’s foot to the pan. Return to a boil, then cover and place in the preheated oven. Braise until the meat is tender and just pulling away from the bone, 90 minutes to 3 hours.
When meat is cooked through, de-fat the sauce with a spoon. (Alternately, you can cool the mixture and refrigerate overnight; the fat will solidify and be easily removed the next day.) If the sauce remains chunky, you may want to remove the meat and puree it with a stick blender; if so, take care to leave some texture.
Heat oil in a skillet over medium-low heat. Add beans, garlic, and saffron, and saute until heated through. Mix in the proscuitto, and season to taste with salt and pepper.
Mix together parsley, almonds, and zest in a small bowl.
To serve, place equal amounts of pork on 6 plates, spooning sauce around. Serve garbanzos on the side, and sprinkle the whole plate with gremolata, reserving some to pass at the table.
Farmers and food artisans who created the ingredients for this week’s meal:
Devil’s Gulch Ranch, Nicasio: Pork shank & picnic meat
Marin Sun Farms, Point Reyes: pig foot
Fatted Calf, Napa: Chorizo
Bariani, Sacramento: Olive oil
Mariquita Farm, Watsonville: Onion, savory
Hunter Orchards, Grenada: Garlic
Tierra Vegatables, Santa Rosa: Ancho chiles & carrots
Short Night Farm, Dunnigan: Green garbanzo beans
Boccalone, Oakland: Proscuitto
Star Route, Bolinas: Parsley
Alfieri Farms, Esaclon: Almonds
Paradez Farms, Exeter: Blood orange…plus our own home-canned tomatoes & paste (from Mariquita’s tomatoes), homemade pork stock, and homegrown coriander.
locavore, meat, One Local Summer, recipes
2 Comments »
Posted by Anita on 06.28.09 3:01 PM
 Two weekends ago, we ran into our friend Jeanne at the farmers market, as we often do. Jeanne had just returned from an East Coast trip, so we had a lot of catching up to do. But after chatting in the summer sun for a while, Cameron and I started to get antsy: We had to get home to start curing pork belly, the first step in making a batch of homemade bacon. Hearing this, Jeanne mentioned she’d always wanted to make her own bacon, but didn’t have the space for a smoker. “We have a smoker you can borrow whenever you want,” we offered. “Or, you could just come over next weekend, and smoke some bacon with us.”
Jeanne is nothing if not determined: When she discovered that none of the farmers market vendors had any pork belly left, she scoured the City for a piece, so she could cure her own batch at home. Knowing that Jeanne and Cameron share a devotion to the Red Sox, I set the bacon-smoking time so that we could all listen to the game together: 10am Sunday. With pork curing in two fridges and the schedule nailed down, our discussions turned to more important things: What should we make for brunch?
“What do you think about huevos motuleños?” asked Jeanne, linking to her own recipe for the classic Mexican egg plate. “I think your fondness of things Mexican equals mine!” (She knows us well — it took me all of 30 seconds to agree.)
So last Sunday, Jeanne arrived right at 10am, with a bundle of cured pork belly, a bottle of homemade hibiscus-lemongrass agua fresca, and a ripe plantain. After we’d loaded up the smoker and dialed in the temperature, we popped back into the kitchen to finish up our brunch. As the sauce warmed, I refried the beans and crisped the tostadas; Cameron fried three sets of over-easy eggs to perfection (all at the same time!); and Jeanne sauteed the plantains and poured tall glasses of delicious agua fresca. Everything came together at just the right time — amazing what you can make happen when three avid cooks share the work. And so, as the smell of applewood began wafting in from the backyard, we sat down to a colorful and delicious Mexican brunch.
Despite its international origins, our team effort made a perfect One Local Summer feast. With the exception of the fried plantains — I claim a brunch-guest exemption! — everything in our meal came from local sources. It took a little creativity (substituting a salty local feta for Mexcian queso fresco) and a few extra steps to keep things locavore-friendly; you could certainly simplify things by using canned black beans and store-bought tostada shells if you weren’t as set on having an all-local feast.


Huevos Motuleños
— adapted from World on a Plate
1-1/2 pounds ripe tomatoes
1 medium white onion, thinly sliced (divided use)
3 serrano chiles, cut into strips
—
1 ripe plantain, peeled and cut into 1/2-inch slices (optional)
2 cloves garlic, diced
1 to 2 cups black beans and their liquid
3 oz ham, cut into matchsticks or small dice
1/2 cup fresh peas, blanched or quick-braised
1 oz (about 1/4 cup) crumbled queso fresco or firm feta
8 eggs
4 corn tortillas
Roast the tomatoes on a rimmed baking sheet, 4 inches below a very hot broiler, until blistered and blackened, flipping to cook both sides. Cool tomatoes in a bowl, then peel while catching all the juices over the bowl. Coarsely puree the tomatoes and juice using a stick blender or in a food processor.
In a medium saucepan, heat 1T oil over medium heat. Add about 3/4 of the onion and saute, stirring regularly, until onions golden, about 8 minutes. Add the tomatoes and chile strips and simmer over medium-low heat for 15 minutes or so, stirring often, until the sauce is beginning to thicken but is still juicy. Season with salt to taste, and remove from heat to let the chiles steep.
(At this point, you can cool and refrigerate the sauce overnight.)
Pour a 1/2-inch depth of oil in a shallow skillet or frying pan. Warm the pan over medium heat until the oil shimmers. Add tortillas, one at a time, and cook until golden; flip with tongs and crisp the other side, then drain on a wire rack over newspaper or over a cookie sheet. Repeat with remaining tortillas until all are toasted.
Pour off most of the oil, reserving some (2T or so) for frying the beans, and leave about a tablespoon in the pan. Return to the heat, and lay the plantain slices in a single layer. Cook for 3 to 4 minutes per side until richly browned. Sprinkle with salt as soon as you take them out of the oil, then drain on paper towels and hold in a warm oven.
Add the reserved oil to the pan, and saute the remaining onions until golden and soft. Add the diced garlic and cook for another minute or two. Add the beans and a spoonful of their cooking liquid to the pan. Mash with a potato masher until beans are soft but some texture remains. Add more liquid as needed to achieve a spreadable texture, and keep warm, covered, over very low heat.
Mix together the ham strips and the peas in another small pan or dish, and warm gently over low heat. Crumble the cheese into a small bowl and set aside. Remove the chile strips from the tomato sauce, and set the pan of sauce over low heat to rewarm.
Finally, fry the eggs using your preferred method. (Traditionally, you want a runny yolk, so sunny-side up or over easy.) Spread some of the beans over each tostada, slide an egg on top, drizzle the tomato sauce over and around the eggs, letting it run off the tostada and on to the plate. Sprinkle each portion with the ham, peas and cheese. Serve immediately.
Farmers and food artisans who created the ingredients for this week’s meal:
Bruins Farm, Winters: Tomatoes
Catalán Family Farm, Hollister: Onions
Chue’s Farm, Fresno: Serrano chiles & garlic
Rancho Gordo, Napa: Black beans
Boccalone, Oakland: Ham (proscuitto cotto)
Iacopi, Half Moon Bay: Shelling peas
Spring Hill Cheese Company, Petaluma: Goat feta
Eatwell Farm, Dixon: Pastured eggs
Primavera, Sonoma: Corn tortillas
Bariani, Sacramento: Olive oil
…plus our own homegrown
epazote for the beans
breakfast, locavore, Mexican, One Local Summer
4 Comments »
Posted by Anita on 06.21.09 8:31 PM
 A few weeks ago, we headed down to Los Angeles for a quick getaway. Ostensibly, the occasion was our seventh(!) wedding anniversary, but truthfully the real purpose of our trip was to eat at all the places we’d been adding to our ever-expanding “must-try” list.
At the very top of said list was Pizzeria Mozza, the newish joint venture from Mario Batali and Nancy Silverton. After hearing rave reviews from pretty much every newspaper, magazine, blog, and friend, we decided to schedule Mozza in a prime Friday-night slot, to make sure we were getting the A-team of cooks and servers.
I won’t bore you with the litany of every thing that went wrong that night — we’re over the tedious exercise of writing negative restaurant reviews — but here’s the short version: Unexciting food, abysmal service, and pacing so unbelievably rushed that we were back in our car just 29 minutes after our first (and only) glass of wine hit the table. Seriously.
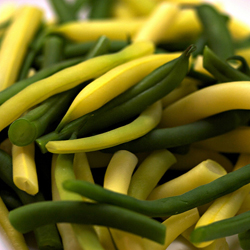
But every cloud has a silver lining. And at Mozza, that lining took the form of a fabulous melange of slender haricots verts, sweet shallots, crunchy hazelnuts, and creamy whole-grain mustard dressing (which, ahem, arrived in place of the roasted-cauliflower dish we’d actually ordered). Amid a menu of fair-to-decent dishes, this small plate stood out, and we quickly realized that we could easily duplicate it at home. We combed through every Batali and Silverton cookbook we own, but found nothing similar. However, Googling “beans + mustard + vinegar + hazelnuts” led us to a likely recipe — not from either of the Mozza chefs, but from Chef Dan Barber of New York’s Blue Hill restaurants.
Although we’re still a few weeks away from finding slim haricots at our market, their larger cousins are already becoming plentiful. And though hazelnuts aren’t grown in the Bay Area, we have plenty of other local options. We opted for walnuts, but made them a little more decadent by rubbing off their skins after toasting them lightly in a pan. After that, the rest of the dish comes together in a matter of a whisk here, a blanch there. And when served with a quick-brined pork chop and the first new potatoes of the year — as we did, for our One Local Summer meal this week — it makes for a great summer side-dish.


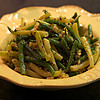

Summer Beans in Grainy Mustard Vinaigrette
— adapted from Dan Barber
1 T finely chopped shallots
2 T balsamic vinegar
12 oz trimmed green and yellow-wax beans (about 4 cups)
1/2 T whole grain mustard
1/4 cup good-quality extra-virgin olive oil
1 T chopped chives
1 T plus 1/4 tsp salt
1/4 tsp freshly ground pepper
2 T blanched nuts (we used walnuts) toasted, peeled if desired, and coarsely chopped
Soak shallots in balsamic vinegar in a small bowl for 30 minutes; set aside for later use.
Fill a saucepan with 2 quarts of water and 1T salt; bring to a boil. Meanwhile, fill a large bowl with water and ice.
When water comes to a boil, add beans and cook until just tender, about 3 minutes. Drain quickly and shock beans in the ice-water bowl. When fully chilled, drain beans well, pat dry, and set aside.
Stir mustard into balsamic-soaked shallots. Gradually whisk in olive oil until blended. (If you’d like a creamier dressing, buzz with a stick blender until well emulsified.) Add the chives, 1/4 teaspoon salt, and pepper; stir until combined.
Toss dressing with beans and nuts until evenly coated; serve immediately.
Farmers and food artisans who created the ingredients for this week’s meal:
Marin Sun Farms, Point Reyes: Pork chop
Fox Barrel, Fairfax: Hard cider (for brine)
Eatwell Farm, Dixon: New potatoes
Dirty Girl Produce, Santa Cruz: Shallots
Bariani, Sacramento: Olive oil and balsamic vinegar
Dwelley Farms, Brentwood: Green and wax beans
Boccalone, Oakland: Whole-grain mustard
Glashoff, Fairfield: Walnuts
…and our own
homegrown chives and homemade chicken stock
locavore, One Local Summer, recipes, restaurants, SoCal
12 Comments »
Posted by Anita on 06.13.09 8:34 PM
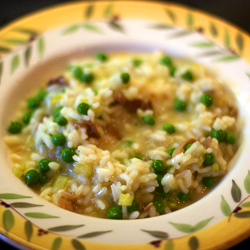 One of the greatest pleasures of growing your own food is standing next to your plot — preferrably while still in your pyjamas — and nibbling on the tenderest first bits of your harvest. I don’t think I’d be exaggerating if I said that Cameron and I probably ate a quarter of our shelling-pea crop in just that way. And even though it cut down dramatically on the number of peas that actually made it to the kitchen, I wouldn’t change a thing.
For this week’s One Local Summer meal, we enjoyed the last of our pea harvest in one of our favorite recipes, a risotto so deliciously savory that we’ve made it three times already this year. We’ve got another batch of peas already slinking their way up the trellis — courtesy of our mild summers, we get to enjoy spring crops nearly all year long — and already I am counting the days until we can make this simple supper again. Because although it’s fine with the regular farmers-market ingredients, it truly becomes its very best when made with tiny, super-sweet, just-picked baby peas.


Risi e Bisi (Venetian Style Pea Risotto)
– adapted from Molto Italiano
2T extra-virgin olive oil
1 shallot, chopped
1 celery rib, chopped
1 oz prosciutto, cut into in 1/8-inch dice
3/4 cup Arborio or Carnaroli rice
1 quart chicken stock, warmed
1 cup shelled fresh peas
2T butter
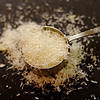
1/4 cup grated hard cheese, such as dry Jack or Parmesan
salt and pepper
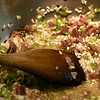
Heat the olive oil in a tall-sided 10-inch skillet or saucier pan. Saute the shallots, celery, and prosciutto over medium heat until soft, about 8 minutes. Add the rice and stir for 2 minutes, until the grains become opaque. Add enough stock to just cover the rice, and stir until stock is absorbed. Continue to add stock a ladleful at a time, waiting until most of the liquid is absorbed before adding the next bit. Taste the rice, and season with salt and pepper. Add peas and cook for 4 minutes, until peas are just tender. Remove from heat, add butter and cheese, and stir until just melted. Serve in warmed shallow bowls.
Farmers and food artisans who created the ingredients for this week’s meal:Bariani, Sacramento: Olive oil
Dirty Girl Produce, Santa Cruz: Shallots
Catalán Family Farm, Hollister: Celery
Boccalone, Oakland: Proscuitto cotto
Lundberg Family Farms, Richvale: Eco-farmed white Arborio rice
Spring Hill Cheese Company, Petaluma: Butter and Dry Jack cheese…plus our own homemade chicken stock, made from
Marin Sun Farms and
Soul Food Farm chicken bones and our own homegrown English shelling peas
locavore, One Local Summer, recipes
9 Comments »
Posted by Anita on 06.03.09 6:19 PM
 I first read about ‘nduja — a red-hot Italian meat paste that’s pronounced “en-DOO-ya” — in Saveur magazine, ages ago. Despite being the sort of foodstuff that’s right up my alley (hello, chiles and pork… together?!), I never seemed to be able to put my hands on the stuff. We’d heard rumors of a stall at London’s Borough Market selling ‘nduja, but our travels there never seemed to line up with their production. It seemed we’d have to make a trip to Calabria for the real thing, or go without.
All that changed last month, with the introduction of locally made ‘nduja from Chris Cosentino’s Boccalone Artisan Meats. This spicy, spreadable salami’s quickly become the darling of the Bay Area carnivores, complete with an adorable nickname and mouth-watering coverage in all the hip spots.
But as delicious as it is when simply spread on a slice of baguette or a cracker, it seemed sacrilegious to snarf down such a long-sough treasure as an appetizer. Searching for other options, I came up with Gina DePalma’s very loose recollection of an ‘nduja-centric pasta dish she whipped up in her Roman kitchen. Despite not being much of a recipe — it lacked both measurements and timing cues — our first attempt at reproducing it turned out incredibly well, if I do say so myself. (You don’t have to take my word for it: Our friend Matthew, a former restaurant critic for the Seattle Times, pronounced it “as good as anything I had in a restaurant” during his visit to San Francisco.)
Now, I’m not sure I’d pick this humble pasta over an evening at SPQR or Contigo, but the dish was far more delicious than the effort it took to whip together. We nearly always have some dried pasta and a frozen container of leftover beans in the freezer; if I just keep a package of ‘nduja around, we’ll never lack a quick, weeknight supper.
The hardest part of the recipe may be getting your hands on the ‘nduja, which isn’t hard at all if you live in or near San Francisco: They sell it at the Boccalone Salumeria at the Ferry Building. For those of you farther afield, there’s always mail order (or a trip to Calabria?). Once you get your hands on the necessary ingredients, free to wing it with the ratios, just as we did. With such flavorful ingredients, I’m sure it’ll be just as good.


Pasta e Fagioli with ‘Nduja
– adapted from Gina DePalma
1 cup dry white beans
1 small onion, diced
olive oil
1 sprig rosemary
1 bay leaf
salt and pepper, to taste
1 carrot, peeled (if needed) and diced
1 stalk celery, chopped
2 cloves garlic, minced coarsely
4 oz (1/2 chub) cured ‘nduja, broken into chunks
8 oz dry small pasta, such as shells or ditalini
more olive oil, for garnish
hard Italian-style grating cheese, such as Pecorino
Soak the beans in enough water to cover by double their height, overnight if possible. When beans are soaked, heat a medium saucepan over medium-low heat; saute the onion in a good amount of olive oil until soft but not brown. Add the beans, their soaking liquid, rosemary, and bay. Bring to a hard boil for a few minutes, then reduce heat to a gentle simmer and cook until beans are beginning to become tender, but still firm. (This will take anywhere from 45 minutes to 3 hours, depending on the age of your beans and the length of their soaking.) Add the salt and pepper to taste, and simmer for another 10 to 15 minutes. At this point, you can discard the herbs and cool the beans in their liquid for later use.
When ready to bring the dish together: If you’ve made the beans ahead, gently warm them in their liquid in a small saucepan. Cook the pasta, stopping a minute or two before the cooking time on the package; drain and set aside. Meanwhile, heat a large skillet and add 2T olive oil. Saute the carrots and celery until soft; add the garlic and saute another minute. Add the ‘nduja, pressing to break it up and melt it as it heats. Add the beans and a small amount of their cooking liquid to the ‘nduja pan, along with the cooked pasta. If the mixture is dry, add more bean liquid until it’s wet; simmer a few minutes to allow the flavors to come together.
Divide the pasta into two or three warmed bowls. Drizzle with olive oil and top with shredded cheese.
This recipe is our entry for the inaugural week of
One Local Summer 2009, hosted by
Farm to Philly, with Western Region posts graciously recapped by
Columbus Foodie. Just like
last year, we’ll be exploring and honoring the foods from our local farmers and producers with at least one meal each week made from 100% local ingredients. We’re not declaring any exemptions this time — other than salt and spices — and our radius will be 100 miles.
Farmers and food artisans who created the ingredients for this week’s meal:
Iacopi, Half Moon Bay: Italian butter beans
Catalán Family Farm, Hollister: Onions
Bariani, Sacramento: Olive oil
Star Route, Bolinas: Carrots
Chue’s Farm, Fresno: Celery and garlic
Boccalone, Oakland: ‘Nduja
Eduardo’s, San Francisco: Pasta shells
Joe Matos, Santa Rosa: St. George cheese
….plus rosemary and bay leaf from our garden
cooking, locavore, meat, One Local Summer, recipes
11 Comments »
Posted by Anita on 05.14.09 6:26 AM
 Despite our enduring love for our nieces and pint-sized friends, this blog will never feature the sort of recipes that usually pass for kid-friendly meals. With high-octane cocktails, labor-intensive recipes, and frequent bouts of profanity, no sane reader would ever mistake me for a mommy blogger. And yet, one of the best food books I’ve read in quite some time — one I actually forked over cash to buy — is Hungry Monkey: A Food-Loving Father’s Quest to Raise an Adventurous Eater. A title that’s shelved not with the cookbooks, but in the heretofore unexplored Baby & Toddler section of my local bookstore.
I doubt Hungry Monkey would have found its way to our house if we weren’t already friends with the book’s author, Matthew Amster-Burton, and his daughter Iris. But that surely would have been my loss, because once I picked it up, I couldn’t stop reading. Or laughing. Matthew’s a pretty funny guy, something you may already know if you read his blog, Roots & Grubs, or his witty writings on Culinate, Gourmet.com, or pretty much anywhere else you go for clever, thoughtful food writing these days. And even if you couldn’t give a fig for the intricacies of raising a little fresser, you can’t help but be drawn in by Matthew’s no-nonsense ideas about food.
Now, in the interest of full disclosure, I think it’s only fair to admit that I’m friends not only with Matthew, his wife Laurie, and little Iris, but also with grandma Judy, and many of the other characters in the book — Tea, Shauna, Molly, and the gang — so reading a chapter is like old home week for me. Some of my favorite memories from our Seattle days involve the dinner parties we used to throw. Every New Year’s Day, we’d make an enormous pot of cassoulet and invite our friends to polish it off; the Amster-Burtons were among the 50 or so food-obsessed friends who came to the second-annual fête.
I don’t remember much else from that day, but I do remember Iris — who had just turned one — sitting on our kitchen floor and calmly polishing off an adult-sized plate of braised pork, beans, and duck confit. Reading the book, I was tickled that Matthew remembered, too: The cassoulet-gobbling tale is but one of dozens of spot-on anecdotes he uses to illustrate his theories. (In this case, the point is: “Stew is the ultimate in baby food. It’s easy to make. It’s easy to eat: you don’t even need teeth.”)
But aside from personal affection, Matthew’s stories of cooking for Iris are universal, whether you’re a parent, a proud aunt, or even kid-agnostic. In a way, my feelings about Hungry Monkey are similar to Matthew’s own enthusiasm for his daughter’s culinary education:
“I was gung-ho about sharing our food with Iris for the same reason people share food with each other everywhere: it’s fun. It was the first opportunity for Iris and me to share an experience and enjoy it for the same reasons. I mean, I liked playing peek-a-boo (I called it “peekytoeâ€) because it made Iris laugh, but it’s not like it’s something Laurie and I played before Iris was born — or, at least, I wouldn’t admit to it. But I like enchiladas. Iris likes enchiladas. We can agree on enchiladas.”
On the surface, I may not have a lot in common with a stay-at-home dad. But our mutual love of food — and a fondness for belly laughs — makes Hungry Monkey worth a read, even if you have no experience with the tribulations of breastfeeding, or coaxing a toddler to the dinner table. With the exception of a couple of purees, there’s hardly a recipe in the book that looks or tastes like kid chow. Last winter, Cameron and I tested a dozen or so of the recipes during the book’s development, and we’ll personally vouch for Matthew’s stacked enchiladas, Cornish pasties, and bibimbap, not to mention a recipe for carnitas that’s so quick and simple we didn’t believe it would work. (It did, deliciously.)
If you need further convincing, plan to pop by one of Matthew’s readings in the Bay Area the week of May 24 (check the schedule here). Photographic evidence indicates that Hungry Monkey is even more hilarious when read aloud by its author.
If you can’t get to one of Matthew’s book-signings, there’s still a chance to have your own brush with fame: I’ve got an extra copy of the book — there is some payoff for being a recipe-tester! — and it just so happens that Matthew will be visiting us on his swing through town. So, if you’d like to win an autographed copy of Hungry Monkey, leave a comment below telling us about your favorite food when you were little. Next weekend, I’ll pick a comment at random and get in touch with the lucky winner to ask how they’d like the book inscribed.
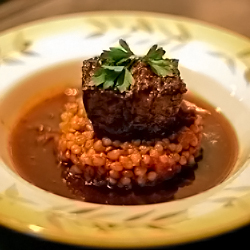
In the meantime, here’s a little proof that not all kid-friendly food has to look like stewed prunes and taste like mush.
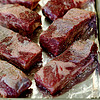

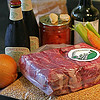

Beer-Braised Short Ribs with Wheat Berries
– from Hungry Monkey by Matthew Amster-Burton, reprinted with permission
3 to 4 pounds beef short ribs (flanken or English-style)
salt and pepper
3 tablespoons olive oil
2 cloves garlic, thinly sliced
1 large onion, diced
1 carrot, peeled and diced
1 celery stalk, diced
1 cup wheat berries (see note)
2 bottles (2-1/4 cups) porter-style beer
1 cup canned crushed tomatoes, not drained
1-1/2 cups chicken stock
2 tablespoons minced parsley
Preheat oven to 450°F.
Season the ribs liberally with salt and pepper and place them on a foil-lined baking sheet (bone-side down if you’re using English style ribs). Roast 45 minutes or until they’re nicely browned and have rendered plenty of fat. Reduce oven temperature to 275°F.
While the ribs are roasting, heat the olive oil in a Dutch oven or other large pot over medium heat. Add the garlic, onion, carrot, and celery. Cook until vegetables are limp but not browned, 5 to 10 minutes.
Add the wheat berries, beer, tomatoes, and chicken stock, and stir to mix. Add the browned ribs, raise the heat to medium-high, and cover. When the pot is boiling, transfer it to the oven (you did remember to turn it down to 275°F, right?). Braise for 2-1/2 to 3 hours, or until meat is very tender. Season with additional salt and pepper to taste.
If serving immediately, remove the meat and strain the sauce, then skim off the fat with a spoon or gravy separator. Otherwise, cool to room temperature and refrigerate everything together, skimming off the solidified fat before reheating. Give each person one or two ribs (remove the bones before serving if you like), a ladleful of wheat berries and sauce, and a sprinkling of parsley.
Note: Wheat berries are available in the bulk section at any health food store. Mine has sometimes managed to run out, so I’ve substituted pearl barley to good effect. Hard or soft wheat berries will work. For another variation, substitute French green lentils for the wheat berries.
cookbooks, meat, other blogs, recipes
26 Comments »
